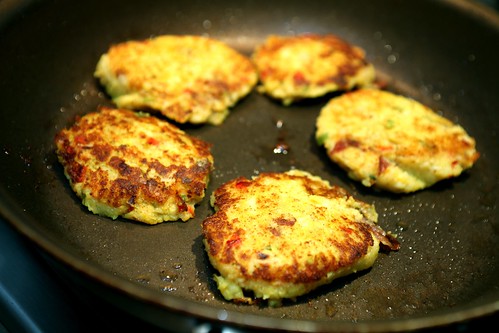
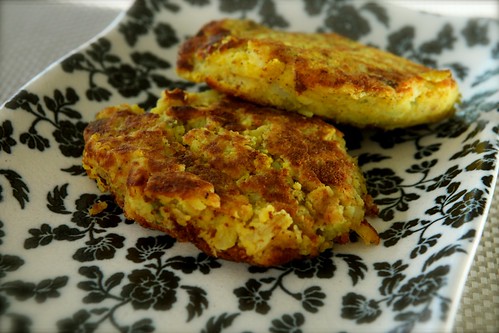
10.28.2009

radio

I've been eating pancakes galore, and you can learn a bit more about a few of my faves for a weekend brunch. There's a new segment this Saturday too!

Check it out on CBC Radio 1010 with Russell Bowers.

10.12.2009

lemon ricotta pancakes with lemon curdiness

It looks like a mess.

lemon ricotta mess

But don't the best things come from messes?

Perhaps that's just my excuse for the intermittent state of the kitchen.

But these lemons don't look too stressed about it. So I guess I'll ignore it too.

lovely lemons

Pancakes. Sometimes, I just need pancakes. Really thick, and fluffy pancakes.

Is there anything better than pancakes on a lazy weekend morning? I'd be very surprised if there was.

I'll admit, that sometimes just a plain old pancake won't do. Not that pancakes aren't fine and good all on their own, but sometimes it takes a little something extra to really let them sparkle.

I decided that I needed lemon ricotta pancakes. But I wouldn't want them to be lonely, what a terrible fate that would be. Instead these pancakes were destined for a life with lemon curd, maple butter, and pomegranate seeds to complete the show.

Cream Puffs in Venice, another food blog, always seems to have the best pancake recipes I've ever tried. So I couldn't say no, when I found a recipe for ricotta pancakes by Bill Granger. I honestly hardly ever have exactly the ingredients on hand for any one specific recipe, so I tweaked it with buttermilk instead of milk, and wanted to use lemon zest instead of orange zest.

I sandwiched these pancakes inbetween some lemon curd, which sounds so lovely and light. Unless you haven't made it before, and then you'll discover that it is virtually all butter and eggs. This is why it is oh-so-fabulous of course.

lemon ricotta pancakes with lemon curd

A dusting of icing sugar might be tacky these days, but alas, not when it is snowing outside, and the tang of the lemons just needs a tad of extra sweetness.

Pomegranate seeds are a little extra festive and fun, especially when raspberry season is over.

These are the ultimate entertaining pancakes. Want to have a showstopping brunch? Try telling your guests that you are serving lemon ricotta pancakes with lemon sandwiched with lemon curd and completed by a a spray of pomegranate seeds. mmm!

Everyone will be in awe with the deliciousness lemony goodness these pancakes deliver.

Start with the lemon curd; best bet is to make it the night before.

Lemon Curd

1/2 cup butter
3/4 cup fresh lemon juice
1 1/4 cups sugar
1 tbsp lemon juice
6 eggs

1. In a saucier or medium sauce pan, over medium-high heat, combine butter, sugar, lemon juice and lemon zest. Cook until the butter has melted and the granules of sugar are no longer visible.
2. In a large heatproof bowl, whisk eggs. Whisk vigorously, while pouring in about 2 separate 1/2 cups of hot lemon liquid. Once combined, transfer the egg mixture back to saucepan, and continue to cook, over medium-low heat, stirring constantly until mixture thickens and coats the back of a spoon, about 5 minutes.
3. Cover the surface directly with plastic wrap. Cool in the fridge until ready to use, ideally 6 hours.

Lemon Ricotta Pancakes (adapted from Bill Granger)

1 1/2 cups, 425 g, ricotta cheese (12% fat content if you can find it)
1 tbsp sugar
3/4 cup buttermilk
4 eggs, separated
1 cup plus two tablespoons of all-purpose flour
1 tsp. baking powder
1/4 tsp. salt
1 tsp. vanilla
2 tsp. finely grated lemon zest

1. In a large bowl, combine the ricotta, sugar, buttermilk, and egg yolks with a wooden spoon. Set aside.
2. With a fork, combne the flour, baking powder and salt. Add to the ricotta bowl, but do not overmix.
3. Add the vanilla and and lemon zest.
4. In an electric mixer, beat the egg whites until stiff.
5. Using a spatula, gently fold the egg whites into the ricotta mixture.
6. In a non-stick pan, heat enough butter to just cover the bottom of the pan. Using an ice cream scoop, add scoops of batter to the pan. Be careful not to raise the pan past medium-high heat, to allow the middle of the pancakes to cook without burning the outside. Allow room between the pancakes. Add more butter between batches of pancakes.
7. To serve, place layers of lemon curd between the pancakes, and a little more for the top. Serve with maple syrup, or a ratio of 2:1 of barely melted butter and maple syrup (SO GOOD!), pomegranate seeds, and a dusting of icing sugar.

10.05.2009

saffron coconut halibut

saffron coconut halibut

Creamy, creamy coconut milk is one of my favourite ingredients to use. I especially like to use it for weeknight dinners, when I am starving, but still want something comforting and delicious.

No one always has oodles of time to prepare dinner. But it doesn't mean that putting dinner on the table is a completely impossible feat involving extensive acrobatics either. I wouldn't say that this is the absolute fastest or the world's easiest dinner to prepare, but pretty darn close. Some cooking is still required.

However, I would serve this dish for friends, and not feel guilty that it takes only seconds of hands on time, and because it is so very deliciously good.

Saffron Coconut Halibut

1 boneless filet of halibut (or similar white fish)
1 can of coconut milk (I prefer full-fat)
1 tsp of saffron threads
1/2 tsp salt

1. Pre-heat the oven to 400 degrees.
2. In a small saucepan, bring the coconut milk, salt, and saffron threads (broken up with your finger tips) to a slight simmer. Be careful, as it splatters easily.
3. Place the filet in a glass baking dish.
4. Pour the coconut mixture over top. Place in the oven to bake for at least 20 minutes, check if the fish is flaking and no longer translucent. Continue to bake until cooked through. This will depend upon the thickness of the fish.
5. Serve the fish over basmati rice, and with chopped cilantro. Enjoy!

9.22.2009

sweet and spicy shrimp with edamame

shrimp & edamame
I don't like to fuss. I like things to be good, and very good, but don't like to fuss. But yes, I am fussy.

That being said, I like to eat when I'm hungry and not waste time. Sometimes it really does feel as though there just isn't time.

This recipe is for exactly those times, when there isn't a moment to spare, but you still want, crave, desire a delicious dinner.

Oh, and an all-in-one kind of dinner, without multiple side dishes. Just cook it and be done with it.

This is one of those dinners.

Shrimp. Edamame. Coconut milk and red curry paste.

Then, you have your choice of starch; I used farro linguine. Soba noodles would also be fantastic (even cook even faster!), as well as rice, barley, regular pasta - you name it. But some sort of grain-like substance that can comfortably soak in, and bask in, the coconut sauce, as a sort of vehicle for coconut milk.

This is a little bit sweet from the shrimp and coconut milk. The red curry paste is an easy way to get the flavours talking. You can add more, but I used 1 tbsp with 2 cans of coconut milk, and it was present, but not overpowering.

Sweet & Spicy Shrimp with Edamame

2 cans of coconut milk
1 tbsp of red curry paste
1 lb of thawed, (previously frozen), uncooked, shrimp
3 cups of frozen, shelled edamame
salt to taste

1. In a large saucepan, bring the coconut milk to a simmer. Allow to reduce slightly, to thicken the sauce, at least 3 minutes (more if you are patient). Whisk in the red curry paste, until thorougly combined.
2. Add the shrimp (thaw it first, or the sauce will be thinner). Continue to simmer the sauce with the shrimp on medium-low heat until the shrimp are almost all pink. Then, add the edamame. Continue to heat, just until the coconut milk begins to simmer. Taste, and season according to taste.
3. Serve over the grain or pasta of your choice. I prefer to mix it in the pot, to heat the pasta with the sauce, and get the pasta thoroughly coated. If the pasta is undercooked to begin with, then this makes for great leftovers the next day.

9.20.2009

chickpea soup

chickpea soup

Chickpea soup sounds terrible, and doesn't really look all that appetizing. But it is one of my all time favourite soups, and oh so good in so many ways.

I discovered my addiction, thanks to Laura Calder. I have been making this soup in gigantic batches with tonnes of paprika, and been enjoying its deliciousness for over a year.

I love this soup because it's beyond incredibly easy. Essentially, the chickpeas, onions, and garlic get plunked in a pot, and covered with liquid. It could even be made in the slow cooker. Then heat, wait, and eventually, purée. The most time consuming part is getting the chickpeas puréed at the end to create a beautifully silky product.

If you're looking for an inexpensive meal, it doesn't get much cheaper than this. I figure it might be around fifty cents to perhaps a dollar per serving, depending.

Of course, the best part of this soup is the taste. Considering just how simple this soup is, it is incredibly fantastic, and even a bit unexpected. It has the nuttiness of the chickpeas, plus the grassy notes of extra virgin olive oil, and then the sparkle of paprika. It just fills you up, and satisfies, all in one.

I often freeze it and take it for lunch many days of the week. It is just perfect; healthful, filling, and tasty.

Chickpea Soup

Adapted from Laura Calder (7-8 servings, for a filling lunch)

2 large or 3 medium onions
4 cloves of garlic
6 cups of dried chickpeas
6 cups of chicken or vegetable stock, plus water (homemade with bits of thyme is extra nice)
bay leaf
1 tbsp paprika, plus more for sprinkling
extra virgin olive oil
salt

1. Peel and chop the onions and garlic (since it is going to be puréed, it can be a very rough chop).
2. In a large stockpot, combine the onions, garlic, chickpeas, stock, bay leaf, and enough water to cover. Don't worry if you add too much water, as you will need more later.
3. Bring to a boil, then lower, and simmer. Continue to simmer until the chickpeas are cooked. Make sure they are not at all hard, or the soup will not be as silky as desired.
4. Remove the bay leaf.
5. Let the soup cool.
6. Using a hand blender, or blender (I prefer for large batches), purée the soup. More water will need to be added, to get it silky smooth. If using a blender, transfer the soup to a large bowl, so that the seasonings can be adjusted.
7. Stir in the paprika, a few good glugs of olive oil, and adjust the seasoning.
8. To serve, garnish with additional paprika and extra virgin olive oil.

9.14.2009

Baba's Perogies on Video

nostalgia

Rule #1.

Never go to Baba's house, yours or anyone's, if you are not prepared to eat. And eat.

And hopefully, if you are lucky, you will be eating a mountain of perogies.

I have made perogies with Baba a number of times, but even still, I really wasn't sure how to get the perogies so very perfect. I think I'm closer, but I'm not a certified-genuine Baba.

For years, I have been trying to get a "recipe" from Baba which didn't always involve, "just another pinch of this", and a "little less than of that", and "you'll just know", and, and, and. As a kid, this just never made sense. How could the perogies taste the same each and every time, when the recipe never was exactly the same?

Now, I understand. However, it is still nice to have a few general guidelines. Plus, it really helps to be able to watch the perogy expert in action, with a few of her tips. For most any type of dough I would make, if it is too sticky, I would add more flour, and it's the same with perogies.

I have to tell you that was very, very hard to get Baba to nail down her recipe, not to make everything in advance, so we could see what she does other than only assemble the perogies.

Oh, and to get her to actually stick to the recipe... albeit somewhat. Even today, I ask for clarifying details on how she would make certain elements, like the dough, because that is what really matters (!!), and she would reply that I don't have to make it that way, or I don't have to have the same cheese, or the same potatoes, or the same... you get the idea. The recipe IS flexible.

However, to REALLY make Baba's perogies. This is how they are made. After all, one of Baba's boyfriends from her youth named his perogy company after her, "Bessie's Perogies". But of course, no bought perogy could ever, ever compare to the real thing.

This video is humorous, but this is exactly what it's like making perogies with Baba and her friend Leon.


Up Close of 7 pounds of boiling russet potatoes for the perogy filling.
mashed potatoes for perogies

Baba had Leon mash the potatoes with one cup of old cheddar.
cheesy mashed potatoes for perogies

Leon working hard.
Leon mashing potatoes

Perogy assembly line. It's much easier to get dozens of perogies made quickly with an army of help.
perogy assembly line

One person to cut the circles. One to roll out balls of filling. And two to pinch the perogies closed.
perogy assembly line

Baba told me to carry the perogies to the stove. You do what Baba tells you, she's the boss.
perogie row

Jeff and Baba taking a quick break from all their hard work.
jeff and baba


Baba's Perogy Dough
5 cups flour
1/2 cup canola oil (scant)
tsp salt
2 cups of hot potato water, really hot, almost boiling

1. Combine the flour, canola oil, and salt. Then stir in the hot water until combined. Knead the dough until it comes together. Add more flour, as needed, to prevent it from sticking to your hands.

Potato Filling
7lbs potatoes, russet potatoes
1/2 cup diced onion sauteed with canola oil
1 cup old cheddar, grated/chopped
tbsp salt, tsp of pepper

1. Peel and boil the potatoes until fork tender. Drain.
2. Dice a large white onion and saute with 1/4 cup canola oil.
3. While still warm, mash the potatoes with the cheddar cheese. Season with salt, pepper, and combine with the onion in canola oil.

Perogy Assembly
1. Divide the dough into smaller sections, approximately 1 cup in size.
2. On a floured board, roll out on section of dough, until approximately an 1/8th of an inch thick. Use more flour as needed to keep the dough from sticking.
3. Using an open-ended soup can to cut circles in the dough.
4. Using one circle of dough, place 2-3 teaspoons of potato filling in the middle of the circle. Pinch the sides of the dough closed. It is necessary to stretch the dough a little bit to get the filling inside, but be careful not to stretch it too thin or the perogies will fall apart when boiled.

Cooking and Storing the Perogies
1. The perogies can be frozen now, or they can be boiled now and then frozen which makes for a quick meal later.
2. To boil the perogies, bring a large pot of water to a boil. Add the perogies, no more than 2 dozen at a time, and cook for 7-10 minutes (depending on the resulting thickness of the dough - taste the perogies to check doneness!). Drain in a pasta strainer, and immediately thoroughly coat with canola oil, or expect a giant blob of perogies.
3. To freeze the perogies, line cookie sheets with parchment paper and place in the freezer. Once frozen, the perogies can be transferred to zip bags.
4. If the perogies were boiled and then frozen, it takes only a couple minutes to serve them. In a non-stick skillet, heat 1 tablespoon of butter, 1/4 cup cream, and large pieces of chopped green onion. Let simmer for at least 3-4 minutes. Add the frozen perogies, and a couple tablespoons of water. Reduce the heat, and cover the pot with a lid. Continue to heat until the perogies are warmed through.