Showing posts with label vegetarian. Show all posts

10.16.2011

finally

Finally, finally, finally, I've got this just right.

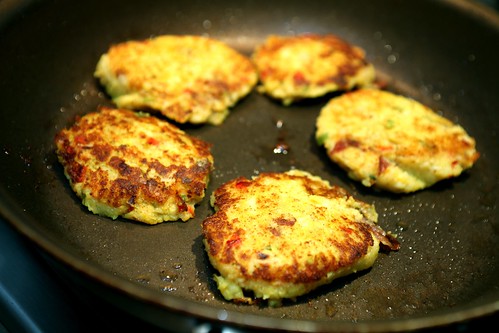
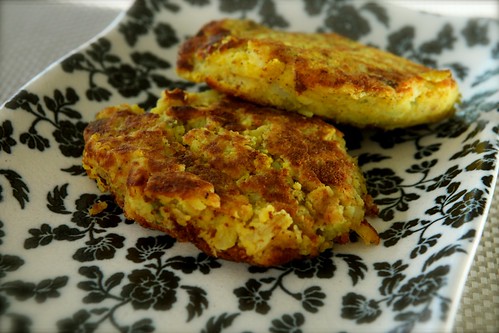
These are so wickedly absurdly good, I can't believe that I haven't discovered them earlier. "Oh?" You say. Yes, that's right, I do. These little veggie-curry-cakes are not only tasty, but full of cauliflower!

It has taken me a few disastrous attempts to recreate a friends' recipe, and trust me, the failed tries were so very bad, that I was skeptical that I should even try again. I had to though. Just trust me when I say that chickpea flour can be very, very bitter.

First off, it is easy to get tired of just eating plain old cauliflower and broccoli, and most improvements on taste, definitely forgo any reasons to eat these tree-like friends for health. Secondly, my kid will eat nearly anything. Okay, so the liver and onion pâté I made for dinner, he didn't really like. However, he does love to eat sautéed onions by the boatload, and will eat gobs of blackberries more tart than most lemons. But cauliflower? Broccoli? Forget it. Hide it? Ha! Disguise it? He'll still recognize it. But in these patties? It even stumped him! Although, he does love curries and spices in general.

I guess you could say that these are mostly potato cakes with a good swack of other veggies, and then some curry powder and cumin to liven things up.

IMG_7346

The recipe makes 16 patties, but it is exceedingly difficult to not eat at least a few...
IMG_7354

Cauliflower-Potato Cakes

Makes 16 patties

1/2 head cauliflower (3 cups), cut into large pieces
4 medium red potatoes, halved
4 medium new potatoes (white), halved
1/4 cup very finely diced red pepper
1/4 cup chopped green onion
1 tbsp chickpea flower (or other flour you prefer)
1 tbsp + 1 tsp salt
2 tsp curry powder
1/2 tsp ground cumin
extra virgin olive oil, or coconut oil for frying

1. In a large stock pot, cover all the vegetables, with water and bring to a boil with 1 tablespoon salt. Cook until the potatoes and cauliflower is fork tender. Drain, and let cool slightly.
2. In a large bowl, place the spices, chickpea flour, and 1 teaspoon of salt.
3. Add the vegetables to the bowl, and mash with a potato masher, and stir to combine everything together into a dough.
4. Using a griddle or nonstick skillet, heat 1 tablespoon of oil. Make patties by filling and ice cream scoop with the dough, release it onto the pan, and then flatten it into a pattie with a spatula. Cook on each side for 3-5 minutes, until golden brown. Consume immediately, or freeze for later. Enjoy! Follow my blog with Bloglovin

2.08.2011

incredible olive oil french fries

olive oil French fries, yes, oven-baked
These are truly incredible.  My seven year old niece was skeptical that I was making fries.  "In the oven?", she asked.  Later she said, "They smell like real fries."  And at dinner, she said they tasted like real fries too.  Then, I knew they were truly good.

Don't worry either, they don't have a distinctly olive oil flavour.  They just taste like utterly fantastic French fries.  Yes, you would pay money for them, and be quite happy about it.  And probably even happier if you watch your pennies, because a sack of potatoes is infinitely cheaper than the cost of soda.

I wish I could tell you that this recipe will make a big greasy mess, and that you have to find a particular kind of oil, and a particular kind of pot.  But you don't.  In fact, not even close.  Unfortunately, you do need a convection oven.  Okay, so there is a hitch.  Honestly though, until now, I have rarely used the convection features on my oven.  There just aren't many baked goods that I prefer burnt on the outside, but raw in the middle.  For fries though, convection is truly perfect.

olive oil French fries, yes, oven-baked
There are two convection features on my oven, and I have found that the one which circulates the most air takes significantly less time, so not all convection is necessarily created equal.  Essentially, potatoes contain a tonne of moisture which the convection helps to dry out, and crisp up the outside of the potato all at the same time.

What? No time to go to the spa?  Prepare for a steamy potato-like facial upon opening the oven door.  Watch your eyes.

Olive Oil French Fries

Ingredients:
Yukon gold potatoes - enough to not quite fill a cookie sheet
extra virgin olive oil - a couple tablespoons
sea salt

1.  Pre-heat the oven on convection to 425 degrees Fahrenheit.  Cover a cookie sheet in parchment paper, or a silpat (just means a bit of an easier clean up;  I like to spend my time cooking, not cleaning).
2.  Wash, dry, and slice the potatoes (preferably with the peel still on), to a thickness you desire.  I liked about a centimeter thick, give or take.
3.  Place the fries to-be, on the cookie sheet, and spread evenly.  Drizzle with a couple tablespoons of olive oil.  If you're skeptical, you can always add more later.
4.  Place the cookie sheet in the oven, and leave it alone for at least 20 minutes.  Then, check it and carefully turn the fries.  This will help to spread the oil even more.
5.  Keep the fries in the oven until the top begins to look golden brown, then give them another turn.  Put them back in, and continue to bake until they are as crisp and as golden as you like.  This might be 45 minutes - 1 hour.  That's it.
6.  Oh right, sprinkle with salt immediately upon removing from the oven.

9.04.2010

butter, is never optional

Today for lunch, was Mark Bittman's Spiced Red Lentil Dal.  I can't get enough of this stuff.  It is filling.  It is delicious.  Healthy.  And, before I start to sound like I'm selling an As Seen On TV, martini, bikini item, just go ahead and try it.  I like to make it in large batches, and freeze it in individual servings for lunch.  However, I do have to disagree with Mark Bittman; butter is never, ever optional.
spiced red lentil dal

5.15.2010

coconut curry with yam, shiitake, and tofu

Yes, I said tofu. Don't freak out; it's not that scary. coconut milk curry Tofu doesn't have to be scary, or inedible. I'll admit there are things I like better, but tofu can be yummy too. It just takes a bit of creativity and some big, bold flavours. I like tofu for its versatility. But it's also fabulous since it can sit in the fridge a good while longer than most meats can, and therefore saves an emergency trip to the store before dinner. Plus, it's super budget friendly. Can't beat that. This is best served with a grain of some sort. I like quinoa. Basmati rice, barley, or kamut would be delicious too. I didn't mix the tofu into the mix, but might be a better idea to help out any picky eater you might have. yam curry with tofu Coconut Curry with Yam, Shiittake, and Tofu 2 tbsp extra virgin olive oil 4 cloves of garlic 1 tbsp curry powder 1 tsp Hungarian paprika 1 tsp ginger powder 1 tsp garam masala 1 tsp ground coriander 4 small crushed red chili peppers 1 can of coconut milk, full fat 5 cups yam or sweet potato, peeled and cubed 1 cup shiitake mushrooms 1 package firm tofu 1/2 bunch of cilantro 1. Pre-heat a deep sided sauté pan. 2. Finely chop the garlic. 3. Add the extra-virgin olive oil to the pan, followed shortly by the garlic. 4. As soon as the garlic has a little colour to it, add the curry powder, paprika, ginger, garam masala, coriander, and chili peppers. It might be time to lower the heat to medium low, if things are getting too much colour. 5. Add the can of coconut milk, and stir. Once the coconut milk begins to simmer, add the diced yam and cover. 6. Cook the yam until tender, adding a little water or broth as necessary. Season with salt to taste. 7. Meanwhile, remove the tofu from the package and drain. Wrap in a couple paper towels, and weight it down between two plates to help remove any excess moisture. Let sit as long as it takes for the yams to become tender. Then cube into bite size pieces. 8. In another nonstick sauté pan, heat a tablespoon of olive oil on medium-high heat. Add the shiitake's. Let them sit for thirty seconds before turning, or they will stick. Repeat. Then add the mushrooms to the yam mixture. 9. Be sure to keep the pan hot, and add the tofu. Do not stir it until each piece has formed a golden brown crust (turn the heat up if necessary). Season with a little salt to keep your fingers occupied. Allow to brown on each side before transferring to serving plates or adding to the yam mixture (your choice). 10. Add some chopped cilantro to the yams and shiitakes. Stir, and serve with the tofu, and alongside a grain or rice if you prefer. Enjoy!

1.04.2010

no-knead rosemary pasta with caramelized onions and walnuts

rosemary pasta Pasta is good, I'm sure most of you will agree. But it isn't necessarily meaty, all on it's own. Sometimes you just want something to taste a little meaty, without the meat. Recently, I have some sort of aversion to nearly any kind of meat, and I like meat. Perhaps am just a little holidayed out. Of course I still want something hearty, and inextricably delicious. For a pasta recipe that excludes tomato sauce, pesto sauce, or just plain old butter, this is a little heaven on a plate. It's also nice to be able to make something from scratch. It doesn't always happen in every sense, but I do love to make my own pasta, even if it isn't as often as I would like. It is always spectacularly romantic to make something from scratch, perhaps a good Valentine's dish? Hint, hint. I have found one surefire way to make pasta dough fairly reliably, and it works pretty darn well since it's much easier. Plus it gets me making my own pasta a lot more often. I'm sure some of you will laugh, some of you may scoff, but hey, it works. And I'm not going to mess with something that works, especially when it prevents me from wearing flour from head-to-toe, as comical as that is. table of pasta Just go ahead and use the food processor. Yep, you heard me, it combines everything evenly and even kneads the dough. I start with 2 cups of flour, 2 eggs, a little salt, and 2 teaspoons of finely chopped rosemary. This should serve four people, although not exactly gluttonous portions. I add all the ingredients to the food processor, turn it on, and let it mix. I add a little extra virgin olive oil, and let it go again. If it starts to really combine into a ball, I'll let it whiz a little more. If not, then more olive oil. Essentially, keep going in this manner (add a quick drizzle of olive oil and wait), and as soon as it gets anywhere near to a ball, then definitely stop adding oil. It is important not to have dough that is too oily to even stick together. Once it has started to combine more thoroughly, then allow the processor to continue to combine until the dough comes together into a ball. Then, allow it to continue to knead for no more than 10 seconds. You can find the original recipe hiding somewhere in the NYTimes online... last seen 5 years ago. After the pounding in the food processor, I wrap the dough with plastic wrap and let it rest at least a 1/2 hour. Soon, it's time for some stretching, and lengthening to make sure it grows up big and tall. Cut the dough into four portions. Using, the traditional hand-cranked pasta maker, I run each piece of dough through on the widest setting. Next, I use the thinnest setting, or the next closest thing, if I want something a little thicker. Then I add on the linguine attachment, and spin through some beautiful linguine. There are longer methods, but I found there is a wider margin for error in running the dough through too many times. The rest of this recipe is adapted from the Greens Cookbook by Deborah Madison, and this recipe can dazzle with its simplicity. After a few years of making this, I have found that the onions need more time to caramelize, the garlic needs more time to cook, the addition of pasta water makes it too watery, and I don't always have walnut oil on hand. So it has evolved a little along the way. I should probably tell you that a few years ago, I gave some of this pasta dough, along with this recipe as a gift. I had made the recipe, and thought it was quite delicious. However, the recipe, even without the pasta has proved so popular that the gift recipient continues to makes the dish over and over again, and absolutely adores it. I hope you do too! rosemary linguine The onions are sautéed with the herbs, creating an irresistible aroma, and enhancing an insatiable appetite. onions and herbs I don't worry about chopping the walnuts too much. A little rough gives it some character, and the final dish a little crunch. chopped toasted walnuts Pasta with Caramelized Onions and Walnuts 1 package of linguine, or rosemary pasta (as above) 1/2 cup walnuts, lightly toasted 2 onions 2 tbsp butter 2 tbsp extra virgin olive oil 1/2 tsp rosemary, finely chopped 2 tsp fresh sage, finely chopped 1 tsp fresh thyme leave, finely chopped 1 clove garlic, minced 1/2 cup dry white wine 3/4 cup Gruyére cheese, finely chopped or grated salt, as needed 1. Thinly slice the onions. Meanwhile, in a large non-stick frying pan on medium heat, warm the butter and extra virgin olive oil until just beginning to bubble. Add the onions, and season lightly with salt. 2. After the onions have sautéed on medium-low heat for approximately 20 minutes, add the fresh herbs, and continue to sauté on low heat until the onions are nearly tender. Try not to let the onions brown and dry out. Then add the garlic, and continue to cook until the onions have a golden caramel colour, and are very tender. 3. Bring a large pot of salted water to a boil, and prepare pasta as directed on the package, but undercook slightly. Alternatively, using the rosemary pasta from above, cooking until just tender, 1-2 minutes. 3. Add the white wine, and stir to combine. Once the wine has a "syrupy" consistency, add a little drizzle of your best quality extra-virgin olive oil, or walnut oil if desired. 4. Stir 1/4 cup (half) of the walnuts, and all of the Gruyére into the onion mixture, and stir until just combined. Taste, and season with more salt if desired. 5. Drain the pasta, and immediately add it into the onion mixture. Combine carefully with tongs, or two wooden spoons. 6. Add a few more walnuts to each plate before serving; serve immediately. Pairs very well with the remaining dry white wine used to add to the onions, or a light red wine, perhaps something French.

9.20.2009

chickpea soup

chickpea soup Chickpea soup sounds terrible, and doesn't really look all that appetizing. But it is one of my all time favourite soups, and oh so good in so many ways. I discovered my addiction, thanks to Laura Calder. I have been making this soup in gigantic batches with tonnes of paprika, and been enjoying its deliciousness for over a year. I love this soup because it's beyond incredibly easy. Essentially, the chickpeas, onions, and garlic get plunked in a pot, and covered with liquid. It could even be made in the slow cooker. Then heat, wait, and eventually, purée. The most time consuming part is getting the chickpeas puréed at the end to create a beautifully silky product. If you're looking for an inexpensive meal, it doesn't get much cheaper than this. I figure it might be around fifty cents to perhaps a dollar per serving, depending. Of course, the best part of this soup is the taste. Considering just how simple this soup is, it is incredibly fantastic, and even a bit unexpected. It has the nuttiness of the chickpeas, plus the grassy notes of extra virgin olive oil, and then the sparkle of paprika. It just fills you up, and satisfies, all in one. I often freeze it and take it for lunch many days of the week. It is just perfect; healthful, filling, and tasty. Chickpea Soup Adapted from Laura Calder (7-8 servings, for a filling lunch) 2 large or 3 medium onions 4 cloves of garlic 6 cups of dried chickpeas 6 cups of chicken or vegetable stock, plus water (homemade with bits of thyme is extra nice) bay leaf 1 tbsp paprika, plus more for sprinkling extra virgin olive oil salt 1. Peel and chop the onions and garlic (since it is going to be puréed, it can be a very rough chop). 2. In a large stockpot, combine the onions, garlic, chickpeas, stock, bay leaf, and enough water to cover. Don't worry if you add too much water, as you will need more later. 3. Bring to a boil, then lower, and simmer. Continue to simmer until the chickpeas are cooked. Make sure they are not at all hard, or the soup will not be as silky as desired. 4. Remove the bay leaf. 5. Let the soup cool. 6. Using a hand blender, or blender (I prefer for large batches), purée the soup. More water will need to be added, to get it silky smooth. If using a blender, transfer the soup to a large bowl, so that the seasonings can be adjusted. 7. Stir in the paprika, a few good glugs of olive oil, and adjust the seasoning. 8. To serve, garnish with additional paprika and extra virgin olive oil.

6.26.2009

summer at last

platter skewered Well almost. Technically, there are another two school days left, for teachers that is. But I think I'm pretty much checked out. Part of me still wants to obsess about next year, but I am trying not to, since there is a ridiculous amount of time to do that; like, say, all of next year. Food wise, I think I have just the hook to get me into the fun in the sun. Shrimp kabobs, and a black bean salad. To delve deeply into the spirit of summer, I am skeptical of such flirtations occurring without the grill. Certainly, there are the requisite items for the grill, tender steaks, juicy burgers, and sweet and crunchy corn. But it is lovely to enjoy something a little bit different than the usual suspects, which honestly, do seem to happen all year, each and every time we find that the wind has died down enough to get the grill going. With each new season, it is nice to enjoy a bite or two that truly drive home the point of the new season. It's summer, and time to make the most of it. Sometimes, I find this hard to actually do. Mostly because I try to keep summer going long into the fall, or at least hoping, and keep reliving the dishes that made summer summer. Last year, it was anything that needed to be chopped or diced, and would keep my little kitchen from overheating, when it has already become a sweat-box. So, I think I've finally gotten into the spirit of this particular summer. I should have rubbed a buddha belly, or found some kinda genie's lamp a long time ago, but I think I've finally found a couple of dishes I will likely want to eat over and over again. skewered Grilled shrimp is fabulously summery. Light, but can almost trick you into thinking about the beach. I love cherry tomatoes on the grill too. Since they are so sweet to begin with, they only seem to get better when their sugars get heated through. But what is summer without a salad? There are so many salads to enjoy, but it can also be easy to get stuck in a salad rut. Black beans with an orange pepper, sweet white onion, cilantro, lime juice and olive oil, is not only healthful, but extremely addicting. I wish you luck if you think there will be leftovers. Black bean deliciousness Summer Shrimp Kabobs *Peeled raw shrimp (somewhat "large", with or without the tail on) Cherry tomatoes Button mushrooms, halved Extra virgin olive oil Juice of 1 lime 1 tsp ancho chili powder Kosher salt Skewers 1. Pre-heat the BBQ, to "medium". 2. In a medium sized bowl, combine the lime juice and the ancho chili powder. Allow the shrimp to marinate in the misture, at least 5 minutes, but not longer than 20 minutes (unless you want ceviche). 2. Once the shrimp have marinated, start placing mushrooms, cherry tomatoes, and shrimp on skewers. Drizzle the skewers with extra virgin olive oil, and sprinkling with salt as you go. Place the skewers on a plate to go to the BBQ. If you prefer, sprinkle a bit more ancho chili powder just in case. 3. BBQ until the shrimp are pink, and the tomatoes are just seared through. 4. Drizzle with more extra virgin olive oil, or alternatively serve with a hot sauce, or a chipotle sauce (also very good!). *I am not being specific about amounts, as you can feel free to be creative with the amounts of tomatoes, or shrimp as you see fit. Some of you might want only shrimp and tomatoes, others might not want tomatoes at all. Just go for it, there is no right or wrong here. insalata Summer Black Bean Salad I love black beans, and eat them often. I hope you will enjoy this salad as much as I do! 1 - 19oz can of black beans, rinsed and drained 1 orange or yellow bell pepper, diced 1 medium white onion, diced 1 bunch cilantro, finely chopped 1 avocado, sliced before serving (optional) Dressing - 4 tbsp, extra virgin olive oil Juice of 1 lime 1 tsp Hungarian paprika 1 tsp ancho chili powder Salt, to taste 1. In a medium-sized bowl, combine the beans, bell pepper, onion, and cilantro. In a smaller bowl, whisk together the olive oil, lime, paprika, and chili powder. 2. Pour the dressing over top of the beans and vegetables. Taste for salt, and adjust as necessary. 3. Once the salad is placed in serving bowls, then place slices of avocado over the top, or dice it. Just don't add it too soon, in order to prevent discolouration. Vacation Italia starts on Wednesday!

5.15.2009

what's in the fridge soup

zuppa due When Jeff and I first met, I used to buy too many vegetables. Okay, maybe not just vegetables, but everything food related. I did have the best of intentions. However, there were always extra tidbits of this and that, which just didn't have a home in any dish - yet. I had to find a solution. One day, Jeff walked into the kitchen and asked what I was making, "What smells so good?", he asked. "It's What's in the Fridge Soup." Then Jeff asked, "Well, what is in it?" I think I giggled, and then said, "everything that used to be in the fridge!" It is possible that I should change the name of the soup to "everything that used to be in the fridge soup", but it just doesn't sound quite right. And I think many, if not most, homes have a soup just like this. Sometimes it has chicken, sometimes meatballs, perhaps leftover spinach pesto, or maybe just a lot of carrots. But the idea is to clear out the fridge, and maybe even the pantry a bit too. I savour soups with the addition of extra greens, as it's a nice change from salad. The soup usually starts with onions sautéed in olive oil. Then maybe some carrots and celery. Probably a couple cans of tomatoes, and a lot of beans. The idea is to come up with something delicious, super-healthful, and could feed a small village for a week. Oh, and the hardest part is washing vegetables and chopping some onions. Otherwise, it's just throw things in a pot, and it all works out in the end. hulled barley The chickpeas are measured by the cup, as I have great success cooking those in the slowcooker, and then I store them in the freezer for later use. It's super easy, and incredibly economical. I just add a couple inches of dried chickpeas into the slowcooker, and turn it on high - my slowcooker is at least 20 years old, so that might be quite low. I cover the chickpeas with double the water. In an hour, I check to see if they are still covered with water, and if not, I add more water. The cooking time varies greatly by brand, but it will take at least two hours. I just taste them every once in a while. At the end I add salt, let it sit for a couple minutes, and then taste again. Drain the chickpeas. Once they are cool, place in zip bags, or reusable containers and freeze for up to 2 months. What's In the Fridge Soup Ingredients: 2 onions, diced 3 stalks celery, diced 1/2 cup carrots, diced 1/4 cup extra-virgin olive oil 2 cups hulled barley, or farro 2 cups pot barley 100 fl. oz. canned tomatoes 750 mL chicken stock 3 cups chickpeas (or one can will do) 1 cans of romano beans 1 can of cannellini beans 1 can of black beans a large bunch of dandelion greens, roughly chopped flat-leaf parsley, chopped salt 1. In a large stock pot, heat the olive oil on medium-high heat. Add the onions, and saute until translucent. 2. Add the carrots and celery, and cook for another two minutes. 3. Using a knife, slightly break up the canned tomatoes, before adding to the pot. Add the tomatoes, chicken stock, and the grains. Bring the pot to a simmer, and then reduce the heat to low and cover. Continue to cook, only until the grains are still a little underdone; approximately 20 minutes, depending upon the type of grain (pearl barley might be less time than pot barley etc.). 4. Meanwhile, rinse and drain the beans. Add the beans to the pot for 3-5 minutes, just to heat through and soften slightly. 5. Add the chopped dandelion greens, and parsley. Turn off the heat, stir. 6. Season according to taste. Serve, and enjoy!

5.11.2009

muhammara, mmmmm

muhahaha My phone has been ringing off the hook. "When are you going to post the Muhammara recipe??" If you want to see empty plates, and full tummies, then this is the trick. I doubt that I've ever seen a plate empty out faster, and I can't encourage you to make this fast enough. I guarantee you'll thankful you did. Make a grocery list, and then run as fast as you can to track down the ingredients. A couple weeks ago, Jeff and I went to Sahara, a Lebanese restaurant, for our second dinner there. And it is mind-blowingly good, and it began that way from the very first piece of pickled turnip I tried. It's not complicated, but everything is succulent, delicious, and even makes you feel quite joyous deep down inside. It's also about having a good time, but when the table is full-to-the-brim with plates and platters of various sizes, it is just about impossible not to have a good time. I have to admit, we've been very lucky to go to Sahara with friends who don't order off the menu, loads of fun, except that then this means that I really don't know what many dishes are called. This isn't because no has told me the names of the dishes, but because I become so completely absorbed, in devouring everything in sight, just as giddy as you can imagine. I have since renamed every dish divine. Luckily just in time for Mother's Day, I received a recipe for muhammara (thanks D!); essentially a red pepper and walnut dip, but that is a paltry way to describe it. Honestly, it makes you think of everything you might want to eat. There is a little sweetness, some smokiness, and little heat for good measure. Then there's garlic, and then something that just piques the palate with delight. Now you just have to dip. It is great with bread, or pita, but also fantastically versatile with multitudes of vegetables. My favourite is carrots. Only dip once of course. Muhammara Adapted from Gourmet, December 1993 2 cups roasted red peppers, drained (I used jarred) 2/3 cup fine fresh bread crumbs 2/3 cup walnut pieces 4 garlic cloves, minced or through a garlic press 1 /2 lemon, juiced 1 teaspoon freshly ground cumin 1/2 teaspoon dried hot red pepper flakes salt, to taste 3/4 cup extra-virgin olive oil vegetables/bread/pita 1. Add the walnut pieces to a food processor, and grind until very fine, but not quite a paste. 2. Heat a skillet on medium heat, and move the walnut mixture to the pan. Carefully toast, and stir frequently. 3. Prepare the breadcrumbs by drying bread in the microwave, and then whizzing in the food-processor, until very fine. 4. Once the walnuts have slightly cooled, add the red peppers, walnuts, garlic, lemon, cumin, red pepper flakes to the bread crumbs in the food processor. Pulse until thoroughly combined. 5. With the food processor running, pour in the extra-virgin olive oil, and continue to combine. Taste for salt, and adjust if necessary. Add more lemon if you prefer. 6. When serving, drizzle a little bit of extra-virgin olive oil over the top. Enjoy!

4.21.2009

skinny dipping

How come beans aren't more sexy? They really should be much more sought after. Chased and cherished, I say. Lets face it, there is a lot to like. Beans are cheap and plentiful. They are just the thing I imagine in the story Stone Soup. little bite Stone Soup is one of those Grimm Fairy Tale stories, my Baba used to read us as kids. One of those stories with a hefty, do good moral to it. I think it starts off with a man, who had nothing to put in his soup except for a stone. Soon, a young lady comes along and asks what the man is making. He says, "Stone Soup, but it is missing some flavour." The young lady thinks this is odd, because of course the soup will have no flavour. However, she has an onion for his soup, so she adds it in. As you can probably already figure out, soon the entire town comes along and adds a potato, or a carrot, or something to the soup...and it becomes a real soup...not just stones and water. The point is, everyone chipped in a little bit and then there was a real meal for a hungry man who otherwise had nothing. Luckily, Baba must have read this to us to make us grateful for what we have, and had better appreciate her cooking (and no wasting, every scrap must be eaten!). But surely, a few beans must have been added to the Stone Soup. Beans have an extraordinary amount of flavour, and even start off a little bit stone-like. I mean, they sure are filling, and certainly pack a whollop of fibre. Perhaps that is what wrecks any seductive qualities the poor beans would otherwise have been missing out on....poor beans. Of course, this can cleverly be used to your advantage if you work in close quarters with people you would rather keep at bay...then beans are your very-bestest-friend. Want your seat permanently reserved? Then add garlic. Raw garlic, and lots of it. At its simplest components, that is this recipe in a nutshell. It's like making hummus, or any other white bean/white kidney bean/cannellini bean dip you've probably seen. This is so easy it's almost criminal to have actually photographed this and then to give you the recipe. Truthfully, I like to mash things up in the food processor, and taste to see if everything is okay. These kind of things are fun. There's not too much to screw up, which is always nice if there is any anxiety present. Except it would be even better, if it didn't require moving the hefty food processor to the kitchen every time I wanted to use it. But it is kind of like hiking the alps, and will keep me in shape for the years to come, yes? Well who knows, but I love beans. And I eat lots of them. Hopefully, that will help my shape too. I've changed my mind. Start in reverse. Yes, you still need the food processor, but start a little mini-chopper processor if you have it. Toss in a bag or box of spinach (say eight cups worth), then continue with garlic, extra virgin olive oil, and parmigiano. Have you have a few nuts add those in too. Make a pesto. Whiz away. Then take the larger, clunker food processor, and add a couple cans of cannellini beans (rinsed bien sur!), more garlic, more extra virgin olive oil, and some salt. Some lemon is nice. Do taste it, and adjust the seasoning; you might like more lemon or more salt. Pucker up. Don't worry so much, you're almost done, and then you can finish cleaning up. You can find containers to put the pesto in, and the bean dip to store in the fridge if you want. It will be top-notch for a good 3 to 4 days....thank the garlic. The finished product should be a bit of a layered effort, with bean dip on the bottom, a good wack of pesto over that, and then a nice sprinkling of feta to complete the look. Serve with voluptuous bowls overflowing with the best seasonal vegetables. skinny dipping White Bean Dip with Spinach Pesto and Feta Serving size (lots!): Great for a party, or halve the recipe. Pesto (a simple one for the dip): 8 cups spinach 1/2 cup - 3/4 cup extra virgin olive oil 2 cloves garlic 1 tbsp parmigiano-reggiano a small handful of walnuts, pinenuts or almonds White Bean Dip: 2-19 oz cans of cannellini beans, rinsed and drained 3 cloves of garlic 2/3 cup extra virgin olive oil 1 tsp salt juice of a lemon Feta cheese, for sprinkling 1. Combine the ingredients for the pesto in the the food processor/mini-chopper, until all the spinach fits, and the ingredients are blended until fairly small. Be careful to ensure there are no large chunks of garlic or nuts leftover. 2. Chop the 3 cloves of garlic into pieces. Add them to another food processor, or after cleaning the same food processor. Combine the remaining ingredients for the bean dip. Blend until the beans are smooth in texture, but be careful that it doesn't result in a glue-like mixture, which can taste almost starchy. 3. To serve, place the bean dip in the bottom or a medium-sized bowl, or deep plate. Spoon half of the pesto on top, and spread it out a bit. Mix it in a little if you prefer. Sprinkle crumbled feta cheese over the top. Serve with fresh seasonal vegetables for dipping.

4.19.2009

Tuxedo Pasta Salad

tuxedo pasta Finally, I think I am no longer required to wear wool socks for the entire day, although I do love the cozy comfort they bring. Now I'm all about sandals, and sunshine; we really don't have four seasons in Calgary, but essentially go from winter straight into summer within a few short weeks. It takes awhile, but at least we do get there (hooray!). I find summer so glamorous. Sunglasses. Sundresses. And salads? Ok, perhaps all three don't work for you. But hopefully this pasta salad will, especially since it's cook once, and then enjoy it's glory for a day or two. Depending of course, how many friends you plan to share it with; you might suddenly find you have many friends which seemingly continue to multiply. Oh darn. I did just get back from a three-day field trip with my junior high band students. So this dish will help me to get back on track after three days of fast-food, and not sleeping that well. I can thankfully say that the trip went fantastically well, no problems. And the only person who bled was the other teacher on the trip, and he didn't even notice! Phew! Now, I have time to obsess even more about the upcoming trip to Italy. I really do love to plan things. It's not like I have a list of 30 restaurants in Rome that I can't decide between. Oh, and we are in Rome for just three days. I am super-excited about the Mercantia festival in Certaldo, total mayhem, I love it! Tuxedo Pasta Salad 1 - 500g (1.1lb) package bowtie pasta Extra virgin olive oil 1 - 19 oz can black beans, rinsed and drained 1 red pepper, chopped 1 yellow pepper, chopped 1 cup broccoli florets (bite-size) 1/2 long English cucumber, chopped (2-3 cups) 1/4 cup finely chopped red onion 1/4 cup extra virgin olive oil 1/4 cup balsamic vinegar sea salt, or kosher salt to taste (1 to 2 tsp) 1. Boil a large pot of salted water. Under cook the bowtie pasta; not quite al dente. The dressing on the pasta, and the liquid of the vegetables will cause the pasta to swell even more. Taste the pasta frequently, the middle should seem almost uncooked. 2. Drain the pasta, and drizzle a couple tablespoons of extra virgin olive oil into the colander. Shake the colander to spread the oil around. Allow the pasta to cool, but do not let it sit too long or it will dry out. Do not rinse the pasta with cold water, unless severely undercooked. 3. Chop the vegetables into bite size pieces. Rinse and drain the beans. 4. Combine 1/4 cup extra virgin olive oil, and 1/4 cup balsamic vinegar into a liquid measuring cup, and whisk. (I prefer a little bit more acidity in this dish than oil, so the proportion is not the usual salad dressing ratio of 2:1) 5. When the pasta is cool, toss with the vegetables. Add the balsamic dressing by the spoonful, being careful to stir the pasta and vegetables inbetween. Stop when the salad seems to have enough dressing. Hint: add the dressing at the last minute, and use less if the pasta iss overcooked. 6. Add salt to taste, I liked a teaspoon. Enjoy!!

4.05.2009

pasta like a rock star

like a rock star Party like one too. The recipe could also be called Penne with Mushrooms and Asparagus, but I figured that sounded about as enticing as pasta with vegetables. Pasta with drunk mushrooms, seemed to have a little more promise, but pasta is kinda like a party, which is sort of like the song which inspired the name of the dish. I will admit that I'm not one to apologize for every little mistake that I make, but I just could not resist calling this pasta recipe just what it is, cheesey or not. Albeit delicious. I insisted on preparing this dish, ages ago, much to my Mother's chagrin because she still used to nag me about dirtying the entire kitchen when I cooked (still do, but it's not her kitchen!). I found it in issue of InStyle Magazine, and I still had a tape-playing-walkman, and I obsessively memorized the phone numbers of friends, because it took too long to painstakingly flip through the pages of an address book. Hopefully that gives you an idea of the date of the magazine issue, as sad as it may be that I remember ridiculously useless details. Now I'm lucky if I even know the area code I'm dialing, since the invasion of the cell phone, but I am still making this pasta dish, which apparently used to be Ben Afflecks' favourite pasta (I know you're swooning, but I was always more of a Matt Damon fan). Apparently, Ben adored with a drizzle of white truffle oil over the top. At the time, I had most certainly never heard of truffle oil, but did recall that my grade eight science teacher went to France, tried a truffle (this is what he told us), and said he couldn't believe what a waste of money it was to eat mold. hmmmm.... then again this was the same science teacher who gave me an 8 out of 10 on a project which was supposed to benefit the environment in some way. Not knowing about the internet yet, and the year was 1991; I said that instead of newspapers, we should read the news on the computer because newspapers themselves were a waste of paper. So I proceeded to draw a little computer with the news on it. I was thirteen. I thought it was a good idea then, and now? Well, I am a tad perturbed, because at this point, I'm solidly believing it is a freaking fantastic idea! It's okay, I've gotten over it, and I like truffles too. In any case, back to the pasta. Penne is so common, and so are mushrooms, and asparagus. But with the nicest, pencil thin asparagus asparagus you can find, it is quite refreshing. But mushrooms with wads of butter, olive oil, and marsala? I lick my little chompers just thinking about it, because the resulting mushroom is full of lustrous delicious flavour. A nice spring pasta, especially good for entertaining. mushrooms and asparagus Pasta Like a Rock Star Adapted from InStyle Magazine, creator unknown (4-6 servings) 1-450 g package penne 3 tbsp butter 2 tbsp extra-virgin olive oil 4 cups thinly sliced mushrooms 1/2 cup finely chopped shallots 4 cloves garlic, minced 1/4 cup dry white wine 1/4 cup chicken broth 2 tbsp dry marsala (or madeira) 1 bunch asparagus, cut to 3/4 inch pieces 1/4 - 1/2 cup chopped fresh herbs - flat-leaf parsley, tarragon, chives 1/2 cup grated parmigiano-reggiano drizzle of white truffle oil (optional) 1. Bring to a boil a small pot, with 1 inch of boiling water. Add the asparagus for thirty seconds, only to blanch it briefly. Remove into a strainer, and briefly rinse with cold water just until cool. Set aside. 2. Cook the penne according to package directions, but more al dente than suggested (there is ample liquid in the sauce for it to absorb) Reserve 1/2 cup pasta water before draining. 3. Meanwhile, heat the butter and olive oil in a saucepan over medium-high heat. Once it is bubbling, add the mushrooms, and cook 5 minutes. Lower the heat, and add the shallots and garlic; cook 4-5 minutes until the shallots soften. 4. Add the wine, and cook until evaporated, 1-2 minutes. Add the chicken broth and cook until the mushrooms are tender and the pan is almost dry. Add the marsala, and salt. 5. Add the cooked penne, asparagus, reserved pasta water, chopped herbs, and parmigiano to the saucepan. Continue to cook until heated through, being careful not to overcook the pasta, but trying to have most of the liquid absorbed by it, 3-4 minutes (depending upon personal taste). Check for seasoning. Drizzle with white truffle oil, but truffle salt is nice too. Serve.

2.15.2009

a very simple salsa

salsa I'm newly obsessed at the moment. Once I start eating this, it is difficult to stop. Luckily, it only requires a bit of chopping, a squeeze, and a pinch to prepare. It's anything but fussy, and other than the taste, that's the best part. Put it with steak, chicken, shrimp, tofu, scallops; perhaps in a warmed (semi-burnt) tortilla with a bit of chipotle, and life becomes good, very, very good. To start, find the best quality onion you can. You're going to be eating a lot of it, and it's raw. Choose an onion that is preferably a bit sweet, definitely not too overly pungent, unless you prefer it. Chop it finely, or however you see fit, to suit your needs. I prefer things a bit rustic, although I do suppose I tend to defer to loud tummy growls. Then find at least one very fresh bunch of cilantro, and crisp it up even a bit more by soaking it in ice cold water for no more than 15 minutes. Allow to dry. Finely chop, similarly to the onion. The size of cilantro bunches, tend to not equal the size of an onion or vice-versa. I like to try to have equal parts of cilantro to onion, which of course, never really works precisely - it's just one of those close enough kind of things. It's okay, trust me! The same goes for the lime, olive oil, and the salt. This is not fancy food, so I'm not going to pretend that there is anything remotely refined about it. Just add a little of this, and a little of that. If you like the end result, then it's like couture salsa just for you. Just be sure to use fresh lime, and a good quality sea salt, or kosher salt (an absolute must!) For a larger onion mixed with 2 bunches of cilantro, combine with the juice of approximately one lime, 1 tablespoon of extra-virgin olive oil, and 1/4 teaspoon salt. Do be sure to have many tortillas on hand, they don't last long!

1.11.2009

jewel tones

Colourful Quinoa As teens, my friend Christine and I meticulously researched our way through every issue of Vogue Magazine. It was somewhat like an archeological expedition, and each one required its own special set of preparations. The most important ritual was to create a gooey chocolate treat. There was our rendition of rice krispie squares, more goo than crisp, or gooey caramel brownies, with more caramel than brownie. Neither of these snacks ultimately made any sense, when you consider that it was nearly impossible to turn the pages of the magazine, but we would giddily hide ourselves away, and virtually study the latest issue like a bible of sorts. In one such issue, I fell head over heels for the works of the Dutch painter Vermeer. You might have seen the painting the Girl with the Pearl Earring, which also sparked a book and a film. Most of Vogues' reproductions of his works not only featured musicians, but also recreated the most impressive palate of colours. The paintings were quite dark, but had such vivid hues with jeweled tones, to command the eye to beauty. Being a quirky girl, without posters of boy band members or horses, I cut out the Vermeer paintings, framed them and hung them up. I am not going to liken this little dish to the work of the great Dutch artist Vermeer. However, after continually staring at this photo and trying to determine what to tell you about it, all I can think of are the colours. Richly-hued tones peeking through something dark, and somewhat mysterious. And that does remind me of his vivid use of colour and light. So that's how I think of this dish with black quinoa, pomegranate, butternut squash, toasted almonds, and sage. Oh, and some maple syrup or agave nectar to sweeten things up. It's the contrast between the rich colours, and textures which create something pleasing to all the senses. Black Quinoa with Jewelry 1 cup black quinoa 2 medium butternut squash 1 pomegranate 1/4 cup sliced almonds 1/4 cup maple syrup or agave nectar 1 tbsp chopped fresh sage (optional) 1. Pre-heat the oven to 350 degrees fahrenheit. Slice the butternut squash in half, and place in a glass baking dish. Drizzle with olive oil, and lightly sprinkle with salt. Cover with tinfoil, and bake until fork tender. Let cool. 2. Cook the quinoa according to package directions; the little ring around the middle should be just starting to come loose, and each grain should still have some bite. Before removing it from the pot, gently stir in the maple syrup/agave nectar. 3. Separate the seeds from the pomegranate, and lightly toast the almonds. 4. When the butternut squash is cool, scoop out the seeds. Cut the squash into 1-inch chunks, and then remove the peel to reveal the chunks. Some more cutting may have to be done after removing the peel to ensure the pieces are of equal size. 5. In a large serving bowl, gently combine the quinoa, pomegranate seeds, butternut squash, toasted almonds, and the sage. Serve at room temperature and enjoy!

12.13.2008

walnut and hazelnut pesto with farro spaghetti

Photobucket Everyone I know loves pesto. There are hundreds of variations, but it's winter outside, and fresh greens, especially basil, can be scarce. However, the shops are loaded with seasonal nuts, and not just holiday shoppers, but walnuts and hazelnuts. Don't worry, making pesto is far easier than last-minute shopping for that long lost auntie. Loading up on walnuts in the winter is wonderful for moisturizing our skin from the inside out. Walnuts are chock-full of omega-3 fatty acids, which also can help to boost our spirits with the shorter, darker days we're experiencing. Hazelnuts have their own healthful contributions of oleic acid, fibre, calcium, and iron too. Just in case, there aren't enough super fatty-acids, I added a tablespoon of ground flaxseed, just to top it off. Making pesto doesn't have to be anything other than a fast and easy meal. Sure, it can be made with a mortar and pestle, and that can be lovely. But don't let the guilt of not being completely authentic, according to ancient principles, scare you away. We have food processors for good reason, so make the most of it. Do go ahead and be creative too. Add more garlic, more parsley, or don't add it at all. If you don't eat dairy, then leave out the parmigiano. The pesto police will not come after you, except that they might want more pesto. Photobucket Farro is an ancient grain of the Egyptians, but now you can find it as a whole grain, or made into beautiful pastas with healthful qualities. Try a few different brands, and you might be surprised with the flavourful addition to your cooking it can make. Walnut and Hazelnut Pesto with Farro Spaghetti (serves 4) 500g farro spaghetti 4 handfuls of whole walnuts (2 cups) 1 handful hazelnuts (1/2 cup) 2 tbsp chopped parsley 2 cloves garlic, chopped 2 tbsp parmigiano-reggiano 1 tbsp ground flaxseed (grind in a coffee grinder) 6-8 tbsp extra-virgin olive oil salt & pepper, to taste 1. Bring a large pot of salted water to a boil. Cook pasta according to package directions. 2. In a food processor, combine the walnuts, hazelnuts, parsley, garlic, parmigiano-reggiano and flaxseed with the olive oil. Be sure to scrape down the sides with a spatula. If the mixture is too thick to combine, then add more olive oil. Mix until everything is well combined and has an even texture. Have a taste, and season according to preference. 3. Strain the pasta. Add the pesto to the warm pot, and stir to evenly distribute the heat. Combine thoroughly with the pasta and serve immediately. Serve with extra grated parmigiano, if desired.

10.20.2008

apple pie oatmeal

Photobucket This morning, I decided that instead of blueberries in my oatmeal, it was time for a change. Besides, apples are in season, and I'm getting tired of the same thing every weekday morning. This is really easy, and hopefully it will power me through the entire morning! Apple Pie Oatmeal (serves 1) 1/2 cup slow cooking oats 1 tbsp wheatgerm cinnamon to taste 3/4 cup water 1 apple, chopped stevia, or maple syrup to sweeten to taste 1/2 cup plain yogurt 1. Combine the oats, wheatgerm, cinnamon, and water in a microwave proof bowl. Microwave on high for at least one minute. Depending on your microwave, you might need more time. 2. Stir in some of the sweetener of choice (you can always add more later). Add the chopped apple, and dollop the yogurt on top. Enjoy!

10.18.2008

pistachio, swiss chard & kale risotto

Photobucket There's only so many salads I can take. And I love salads. But sometimes, I just need my greens in another way. Like pesto, or blended into brownies (you'll never know if you still use butter and sugar... I swear it!) This becomes even more true as I start to pull out my wool socks, wool hats, and my down coat. I need greens even more, but they even have to warm me up from the inside out, in a soulful kinda way. My all-time favourite risotto is risotto milanese (with saffron), but it isn't exactly full of healthful vegetables, or really anything healthful at all. But it is just so divine.... This risotto with pistachio's, swiss chard and kale, uses the same techniques, but it takes these super-green veggies to give it a wolloping punch. These vegetables aren't exactly ones I want to eat in a salad everyday, but they sure are good with a bit of rice, butter, and cheese. This is especially good for those, who would never eat these greens otherwise! When I suggested we have risotto for dinner, and asked Jeff which kind he would like; he immediately stated, "pistachio". Pistachio it is. Pistachio, Swiss Chard & Kale Risotto 1 cup arborio rice 2 tbsp butter 1/2 cup white onion 1/2 cup dry white wine 1 liter chicken or vegetable stock 1 bunch kale 1 bunch swiss chard 1/2 cup shelled pistachios 1 cup parmigiano-reggiano chèvre (optional) salt, to taste 1. Finely chop the onion. 2. In a food processor, combine the kale, swiss chard, and pistachios with 1/4 cup water, for approximately 10 seconds. Scrape down the sides with a spatula, and pulse for another 5 seconds. 3. Add the stock to a sauce pan, and heat on medium low. 4. In a deep-sided sauté pan, heat one tablespoon of butter on medium heat, until it begins to bubble. Add the onion, and sauté until soft and transcluent, not allowing it to brown. 5. Add the rice to the sauté pan, and stir until well coated with the butter. 6. Add the dry white wine, and stir until evaporated. 7. Add a ladle of the soup stock to the rice mixture. Stir, and allow the mixture to cook down before adding more stock, only one ladle at a time. 8. Before the last amount of stock is added, add the kale, swiss chard, and pistachio mixture. Add the remainder of the stock. 9. Remove the pan from heat, and gently stir in the parmigiano, and the remaining tablespoon of butter. Season to taste. 10. Serve immediately, with a spoonful of fresh chèvre for extra creaminess.

10.15.2008

miso garlic spaghetti squash

Photobucket I know spaghetti squash is hard to beat. Unless you add some sort of buttery goodness to it, then it's undeniably good. It's even addicting, and absolutely impossible to refuse. But it can start to sound like a broken record if you're not careful. So toss some cabbage into the mix. That requires something else entirely. Like some spicy green onions, and some sort of Asian inspired sauce. Something with miso. And make it pronto. Jeff and I were on the way out the door for a busy afternoon of weekend errands, and needed something energizing, and ready stat. I wanted to get out the door for some fun, before all the shops close. I was so glad that we were lucky enough to have found a large spaghetti squash, the luscious middle all cooked, and ready to go. Yes, leftovers. And this spaghetti squash needed a new life, to be reborn if you will. No butter or tomato sauce today. Yes, I was in a hurry, and for some reason decided I needed to be creative, but just a little indulgence. Miso always gives me a chance to believe in the ultimate contradictions; salty and sweet. Only because I almost always make it into some kind of paste or sauce. Using a dollop of honey, miso transforms from a salty paste, to an irresistible addiction. It's like a little salt, with an enormous flavour punch. To prepare the spaghetti squash, pierce it a few times, and place in a pan in a 350 degree oven. Roast until easily punctured with a fork. Alternatively, a spaghetti squash can also be cooked in the microwave (be certain to pierce the flesh with a knife). Let the squash cool slightly, and then slice it open. Using a fork, remove the seeds and the accompanying matter. Remove the rest of the spaghetti into a large bowl, or straight into bowls for serving. miso garlic spaghetti squash (serves 1) 1 cup cooked spaghetti squash 1/2 cup chopped cabbage 1 tbsp sliced green onion miso glaze: 2 tsp honey 2 tsp miso juice of 1/2 a lime 1 clove of garlic, crushed 1. Combine the ingredients for the miso glaze into a small bowl, whisking thoroughly. Add to a saute pan on medium heat, and allow to warm until almost bubbling. 2. Add the spaghetti squash to the pan, and thoroughly coat with the miso glaze. 3. When the squash is heated through, add the cabbage for a quick dip. 4. Garnish with green onion, and enjoy!

9.20.2008

asparagus with arugula pesto and parmigiano

Photobucket Well I don't know, and I could be wrong, but asparagus is just so swell and good. It's for all those meals you think will require a green salad, and then you realize that there is no lettuce in the fridge, and you just can bear to head to the store even once more. Thin little spears of asparagus are my favourite, but they don't have to be imported from France as less than pencil thin (although those are good too). But there should be a sweetness, and tenderness found in smaller spears, which just accompanies most other dishes, or can be cooked into other creations just as well. Sometimes, I like asparagus to be a little bit more special. A little more of a main feature of a meal, with their own character and deliciousness out of the ordinary. Pesto and parmigiano just flavourful enough to yummify an already elegant vegetable. Asparagus with Arugula Pesto & Parmigiano For the pesto: 8 oz arugula (1 bag), washed and dried 2 cloves of garlic pinch fleur de sel 1/2 cup extra virgin olive oil 1/4 cup parmigiano-reggiano For the asparagus: 1 bunch aspargus 2 tbsp arugula pesto 1-2 tbsp parmigiano reggiano 1. Using a mortar and pestle (or food processor), combine the ingredients for the pesto until a thick, and even paste (pesto) has formed. 2. Lightly steam the asparagus (3-5 minutes or to taste). 3. In a sauté pan, thoroughly warm the pesto. Add the asparagus, and combine. 4. Place the asparagus on warm plates, and grate the parmigiano-reggiano over the top. For extra zing, also add some lemon zest. Bon Appétit!

8.28.2008

chickpea, corn and crunch salad - some salads don't need any vinegar

Photobucket There are moments of my time which are completely calculated, and premeditated. Usually silly things like ensuring there is enough cream and eggs in the fridge for the makings of ice cream, or endlessly searching recipes to find the right one to use the special vanilla in. How ridiculous, I know. But, what could be better, and why wouldn't I plan that? Especially since the rest of the time, I am often completely succumbed to following the pangs of hunger - that is if Jeff doesn't beat me to it and start cooking first. So planning lunches, to-go, can seem a little bit mundane, as I am just not hungry for lunch at 5:30 in the morning. Imagine my shock when I come to the realization, as an over-zealous vegetable shopper, that really there are no vegetables in the house. How can this be? Is this some kind of bizarre joke? The fridge was bursting at the seams with aromatic garden scents just days ago. Now, there is just nothing to eat, I swear it. My mother used to hate these moments, when I stand and blankly stare into the fridge, "What do you think is going to fall out of there? If you want something you have to look for it. STOP, holding the fridge door open for so long!" Sheeesh. I find it hard to open the fridge door to this day. Well sure, there's lots to eat, but all of it requires significant cooking, and I'm in a hurry to get to work. Immediately, I begin to hard boil eggs. Maybe that will solve the problem of no lunch for the soon to be hungry girl, yes? Well, no, the novelty wore off (maybe tomorrow). I continue to scrounge, and discover that really there are vegetables hidden in the depths of the fridge, just under used, misjudged vegetables lurking in there. Take corn on the cob for instance. Except that, immediately, butter comes to mind, or the feeling of little corn holders sliding within greasy fingertips. But, even though I use it in many dishes, I sometimes don't think about using it as much as I should. And it is really so lovely, especially raw, so sweet, so crispy, so perfect with red onion, which also lurks in the crisper, only to have a slice sheared off here and there. For many reasons, I eat a lot of chickpeas in salads for lunch, and these I always have on hand, always. They are inexpensive, a good source of protein and fibre, and they are just about as nutty as I tend to be. But really, I just like them. I cook chickpeas in the slow cooker, just rinsing them first, then I cover them with water and give it a whirl. I just check that they are always covered with water, sometimes adding a bit more. I taste them to decide when a texture I like is achieved, and then I season with a bit of salt. Sometimes I toss a clove of garlic in the works, if I'm feeling adventurous - yes I do realize this is a pathetic sense of adventure, but it is a noble cause nonetheless. The best thing is that I always have the makings for hummus, as I keep bags of chickpeas frozen, specifically for my sometimes mundane salads with chickpeas. Chickpeas are my lunch when there is nothing else to be had. No leftovers, nada. Today's salad was different. First of all, there was no lettuce. And there was no acid for a vinaigrette, just olive oil. There was also finely chopped celery, and nearly minced red onion; things I hate to do early in the morning, even though I love my knives. It just doesn't feel like the right time of day to inhale a pungent onion smell, as much as I love to eat it's spicy fruit when paired with a rich chickpea. It is worth the effort, and a fairly small effort at that. This salad didn't even require a separate container to store a dressing, so I guess that was one less thing to do, no? Chickpea, corn, and crunch salad (Serves 1) 1 cup cooked chickpeas 1 stalk celery, diced 1 corn on the cob 1/2 tbsp finely chopped red onion extra virgin olive oil, to taste 1. Remove the husk from the corn. Using a medium-sized bowl, place the end of the corn into the bowl, so the corn is upright. Cut the kernels in the bowl with a sharp knife. 2. Combine the corn with the chickpeas, celery, and red onion. Lightly dress with olive oil.
Related Posts with Thumbnails